


How To Construct a Basic Sleeve Block
March 27, 2026 - March 27, 2026


By following these simple steps you can construct a basic sleeve block which can then be adapted to any design.
This can also be transferred onto card and re-used.

|
1. Take a piece of paper, sufficiently large to support the arm measurement referred to in step 2, and fold it in half, lengthwise |
|
|
2. Measure and mark out the over arm length on the fold of the paper. Label the top mark A and the bottom mark B. |
|
|
3. Measure the length taken for the under arm from point B towards point A as shown in the diagram. Then mark this point as C on the fold. |
|
no pic |
4. Add 1″ ease to the bicep circumference measurement and divide the answer by 2. [(Bicep+1) / 2] |
|
|
5. From point C, draw a perpendicular line from the fold towards the left the length of your measurement [(Bicep+1)/2] derived from Step 4. Mark the end point D as shown. |
|
no pic |
6. Add 0.5″ ease to the wrist circumference measurement and divide the answer by 2. [(Wrist+0.5) / 2] |
|
|
7. From point B, draw a perpendicular line from the fold towards the left the length of your measurement [(Wrist+0.5) / 2] derived in Step 6. Mark the end point J as shown. |
|
|
8. Open up the paper (unfold it). From point C, draw, towards the right, another horizontal line equal to line CD derived in Step 4. Mark the end point E as shown. The bicep line is now complete. |
|
no pic |
9. From point B, draw, towards the right, another horizontal line equal to line JB derived in Step 6. Mark the end point K. The wrist line is now complete. |

|
10. Draw a line from point A to point B to mark out the over arm length measured earlier in Step 2. This line will also function as the grain line. |

|
CHECKPOINT
BLOCK SO FAR SHOULD LOOK LIKE THIS |

|
11. Connect points D and J, E and K. |

|
12. Divide line DC into 4 equal segments. Mark the first quartile from point D, point F. [ DF = 1/4 DC ] |

|
13. Divide line CE into 8 equal segments. Mark the last segment closest to point E, point G. [ GE = 1/8 CE ] |

|
14. Add the lengths of DF and GE. From point A, draw a perpendicular line towards the right equal to DF+GE. Mark the end point H. [AH = DF + GE] |
|
|
15. Multiply the length of DF by 2. From point A, draw another perpendicular line towards the left equal to 2DF. Mark the end point L. [ AL = 2DF ] |

|
16. Connect the points F and L. |

|
17. Mark point 1, on line FL, equal to the length DF from point F. [ F1 = DF ] |

|
18. Connect the points G and H. |

|
19. From G, mark a point 2, on line GH, equal to the length of GE from point G. [ G2 = GE ] |

|
20. From H, mark a point, 3, on line GH, equal to the length of AH from point H. [ H3 = AH |
|
|
21. Using a French Curve, draw a smooth curve from point A to point 1, and then from point 1 to point D. On the other side, point A to point 3, then point 2 to point E as shown. SUMMARY OF STEPS 2 – 21
|

|
22. Mark the left half of the pattern ’Front’, the right half ’Back’. The front has a curvier sleeve cap whilst the back sleeve cap is less curved. |
|
23. Measure the front cap from point D to point A, and then the back cap from point A to point E. Compare to the front and back armscye on the bodice. The front sleeve cap must ideally be up to 0.5″ (max) bigger than the front armscye. This also applies to the back cap and armscye. You can increase or decrease the sleeve cap measurement as shown below. The total length of the sleeve cap should be anywhere between 0.5″ to 1″ (max) bigger than the total armscye measurement of the main bodice block (sloper). |


Red lines = increase
Blue lines = decrease
PLEASE NOTE
The drafting of the armscye curves on the sleeve is rather arbitrary. There really are no hard and fast rules or formulae to developing the one with the best fit. The previous steps simply aid you towards drawing a front scye that will accommodate the forward-jutting ball joint the shoulder, and a slopier one for the back. You must constantly measure and remeasure both the scyes on the bodice and the sleeve to ensure the ease differences are accurate as explained in Step 23.
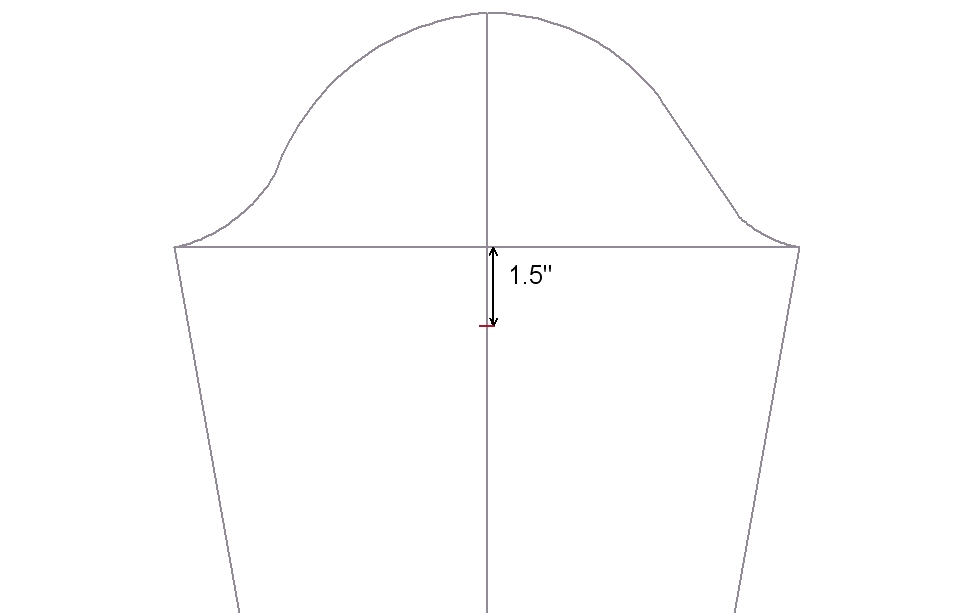
 Shortened to 1.5″ below bicep line
|
Finally, you can also adapt the long sleeve block for a short sleeve. This is very easy to do. First, measure down from the centre of the bicep line the length of the short sleeve desired. In this example we will use the length of 1.5″. |

|
You can also choose to measure from the top of the sleeve cap down along the centre line to a point where you’d like the sleeve to end. |

|
Then draw a line, perpendicular to the centre line (or parallel to the bicep line), across the width of the sleeve as shown. |

|
Cut away the pattern below this line and you have your shortened sleeve. |

|
Cut along the new hemline… and you have a short sleeve! |


