<< back to Tools
Pockets
June 20, 2026 - June 20, 2026
It is essential that a pocket is made strongly and large enough for the purpose it is needed.
It must be attached firmly to avoid strain on the garment as well as looking visually pleasing as a design feature.
There are many types and adaptations of a pocket that can be worked on at the design stage. Two general methods of pockets are Patch pockets and Welt pockets.
|
Patch Pocket
|
The pocket is formed by sewing a patch of fabric onto the right side of the fabric with the use of top stitch.
Simply cut a piece of fabric the desired size and shape of the pocket designed. Neaten the edge by:
- Turn the plain hem approx. 1.2cm onto the wrong side of the fabric and hem this into place.
- Turn the plain or shaped hem onto the right side and top stitching it into place
- Attach a straight or shaped facing of self-fabric on or of a contrasting decorative fabric.
- Follow the general methods for applying a facing
- Match the notches and machine stitch on
- Press stitching and turnings
- Turn facing to the right side and turn under 0.6cm and pin into position and top stitch
- Complete the top edge as required
- Fold turnings of pockets onto the wring side on fitting line and pin
- Trim seam allowance down to 0.6cm
- Match notches and place the pocket in position on the garment and pin
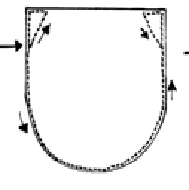
- Machine stitch around the pocket as in the diagram below
- Press
|
|
Welt Pocket
|
- This is a pocket that is set into the garment with a welt to strengthen the opening. This is the only section that is visible when the pocket is complete.
- The pocket can be inset on the straight grain or at an angle.
- The pocket is made from two pieces of fabric. This can be done with two pieces of the garment fabric cut. It is traditionally done with one piece of the pocket fabric and once piece of lining fabric.
- Mark the position of the pocket mouth. If this is at an angle support this with a section of interfacing before the slit is cut.
- Make sure all pocket pieces are over locked
- Fold the welt length ways right side together
- Pin and machine edges on the fitting line.
- Press and trim seam allowance to 0.6cm
- Turn the right sides out and press again
- Pin the prepared welt 0.5cm below the cut line and facing downwards
- Place the front lining section of pocket on top of the welt
- With right side of lining and right side of the garment together pin through all four layers
- Place the back section of the pocket above the pocket mouth with right sides together
- Pin into position with the fitting line 0.5cm above the position marked for the pocket mouth
- Machine stitch the fitting line each side to the exact width of the pocket mouth
- Remove pins and press
- Fold pocket mouth in half and snip on the fold
- Open out and cut seam allowance down to 0.6cm and then snip into the corners
- Turn both pieces of the pocket through to the wrong side and press the seams so that each piece is facing downwards
- Press the welt into a right hand position
- Pin the front and back pockets piece together
- Machine stitch around the pocket
- Pin welt seam into position on the right side of the garment and top stitch both ends from the right side making sure both ends are very secure as they will take the most strain
- Press
|
<< back to Tools


